Day 5- IR remote Decoding in Ardino
Day 5 - IR remote Decoding using Arduino.
Task
1) Install IR library in Ardino IDE
2) Decode any IR remote Keys
3) Control LED using IR remote
4) Control 4 LED's using ir remote
5) Connect LCD to Display IR decoded Values
6) Make 4 Ch IR remote Control Home Automation Circuit
7) Control RGB LED using IR Remote
8) Control 4 LED with 4 Push button and IR remote
9) 4ch Home automation using 4 Relay, 4 Push button, IR remote and LCD
10) Set time in RTC using IR remote
This is another user friendly tutorial for making a very simple IR Remote decoder using an Arduino and IR receiver. This tutorial will cover everything from setting up the software to using the IR Receiver and decoding the signals . These signals can be used later for multiple projects including IR Remote control Robot , Home automation and similar IR controlled projects.

First check the PinOut diagram of the IR receiver you have. IR receivers have 3 pins, +ve , GND and Out. Before using any receive make sure you know these pins. If connected improperly the setup won't work and you will find it difficult to figure it out.
Make the following connections :-
1. Connect +ve pin of receiver to 3.3v of Arduino.
2. GND pin of receiver to GND of Arduino.
3. Out pin of receiver to Digital pin 11 of Arduino.
connect the arduino board to computer as we need to upload the code and monitor the IR pulses.

Download IR Library.
Extract the downloaded file.
Copy the extracted folder.
Goto >> C drive >> Programs Files (x86) >> Arduino >> Libraries.
Paste the folder in Libraries.
OR
install online using arduino ide
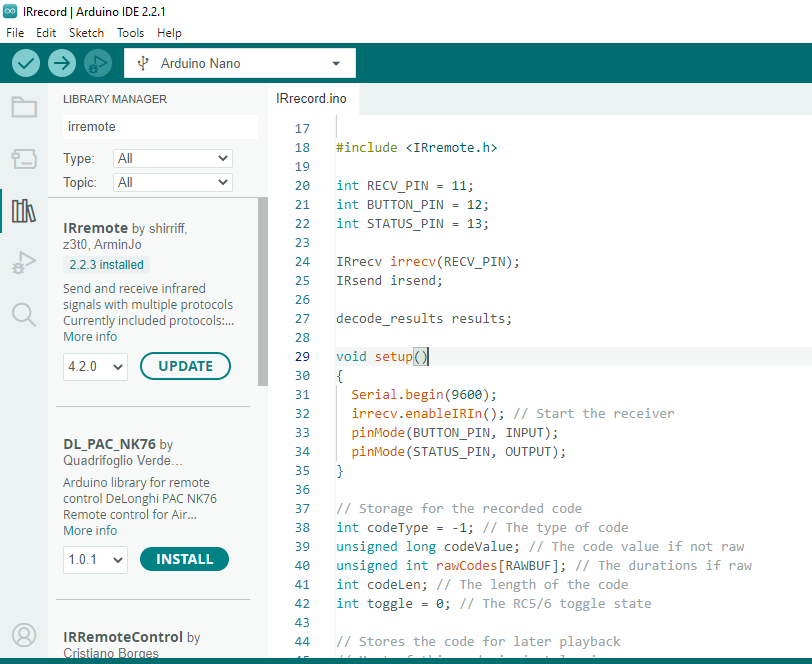
That's it IDE is ready to work with our code.
// IR remote Decode
#include <IRremote.h>

int IRpin = 12;
IRrecv irrecv(IRpin);
decode_results results;


void setup()
{
  Serial.begin(9600);
  irrecv.enableIRIn(); // Start the receiver
}
void loop()

{
  if (irrecv.decode(&results))
    {
     Serial.println(results.value); // Print the Serial 'results.value'
      delay(10);

     irrecv.resume();   // Receive the next value
    }
}
------------------------------------------------------------------------
copy the above Code I have provided and upload it to Arduino Board.

Once the code is uploaded, Goto tools and select serial monitor.

The ardunio should restart/rest and you are ready to collect the codes of your remote. Just point the remote towards the IR receiver and press the button you have to decode the signal of. A hexadecimal value will appear on the screen , these are the IR codes you need to note which will be needed for future IR remote operated projects.
-----------------------------------------------------------------------------
In this tutorial we will see how to use the decoded values to turn devices on/off, for example LEDs. Here I will demonstrate it using two LEDs. So without wasting any more time, let’s get started.

-------------------------------------------------------------// remote control LED
#include <Wire.h>#include <IRremote.h>int irPin=11;char Received;IRrecv irrecv(irPin);decode_results results;int relay2=2;int relay3=3;int relay4=4;int relay5=5;int M2=0;int M3=0;int M4=0;int M5=0;void setup(){Serial.begin(9600);pinMode(irPin,INPUT);pinMode(relay2,OUTPUT);pinMode(relay3,OUTPUT);pinMode(relay4,OUTPUT);pinMode(relay5,OUTPUT);digitalWrite(relay2,LOW);digitalWrite(relay2,LOW);digitalWrite(relay2,LOW);digitalWrite(relay2,LOW);irrecv.enableIRIn();}void loop(){////////////////////////////////////////////// IR Remote Code //////////////////////////////////////////////////////////////////////if (irrecv.decode(&results)){Serial.println(results.value, DEC);if (results.value ==16756815 || results.value ==16740495){switch (M2){case 0: M2=1; Serial.println("Relay 2 OFF"); digitalWrite(relay2, HIGH); delay(300); break;case 1: M2=0; Serial.println("Relay 2 ON"); digitalWrite(relay2, LOW); delay(300); break; }}if (results.value ==16750695 || results.value ==16742535){switch (M3){case 0: M3=1; Serial.println("Relay 3 OFF"); digitalWrite(relay3, HIGH); delay(300); break;case 1: M3=0; Serial.println("Relay 3 ON"); digitalWrite(relay3, LOW); delay(300); break; }}if (results.value ==16767015 || results.value ==16734375){ switch (M4){case 0: M4=1; Serial.println("Relay 4 OFF"); digitalWrite(relay4, HIGH); delay(300); break;case 1: M4=0; Serial.println("Relay 4 ON"); digitalWrite(relay4, LOW); delay(300); break; }}if (results.value ==16744575 || results.value ==16732335){switch (M5){case 0: M5=1; Serial.println("Relay 5 OFF"); digitalWrite(relay5, HIGH); delay(300); break;case 1: M5=0; Serial.println("Relay 5 ON"); digitalWrite(relay5, LOW); delay(300); break; }}if (results.value ==16748655){M2=1; Serial.println("Relay 2 OFF"); digitalWrite(relay2, HIGH); delay(100);M3=1; Serial.println("Relay 3 OFF"); digitalWrite(relay3, HIGH); delay(100);M4=1; Serial.println("Relay 4 OFF"); digitalWrite(relay4, HIGH); delay(100);M5=1; Serial.println("Relay 5 OFF"); digitalWrite(relay5, HIGH); delay(100); }if (results.value ==16760895){M2=0; Serial.println("Relay 2 ON"); digitalWrite(relay2, LOW); delay(100);M3=0; Serial.println("Relay 3 ON"); digitalWrite(relay3, LOW); delay(100);M4=0; Serial.println("Relay 4 ON"); digitalWrite(relay4, LOW); delay(100);M5=0; Serial.println("Relay 5 ON"); digitalWrite(relay5, LOW); delay(100); }irrecv.resume();}}--------------------------------------------------------------------------// 4ch relay module control using IR remote#include <IRremote.h>int RECV_PIN = 11;int LED1=2;int LED2=3;int LED3=4;int LED4=5;byte LED1status=0;byte LED2status=0;byte LED3status=0;byte LED4status=0;IRrecv irrecv(RECV_PIN);decode_results results;void setup(){Serial.begin(9600);pinMode(LED1,OUTPUT);pinMode(LED2,OUTPUT);pinMode(LED3,OUTPUT);pinMode(LED4,OUTPUT);digitalWrite(LED1, LED1status);digitalWrite(LED2, LED2status);digitalWrite(LED3, LED3status);digitalWrite(LED4, LED4status);Serial.println("Enabling IRin");irrecv.enableIRIn(); // Start the receiverSerial.println("Enabled IRin");}void loop() {if (irrecv.decode(&results)) {Serial.println(results.value, DEC);if (results.value==16756815 || results.value==15695999 ) { LED1status=!LED1status; }if (results.value==16750695 || results.value==15663359) { LED2status=!LED2status; }if (results.value==16767015) { LED3status=!LED3status; }if (results.value==16744575) { LED4status=!LED4status; }if (results.value==16748655) { LED1status=1; LED2status=1; LED3status=1; LED4status=1; } // power buttonif (results.value==16760895) { LED1status=0; LED2status=0; LED3status=0; LED4status=0; } // mute buttonirrecv.resume(); // Receive the next value}digitalWrite(LED1, LED1status);digitalWrite(LED2, LED2status);digitalWrite(LED3, LED3status);digitalWrite(LED4, LED4status);delay(100);}-------------------------------------------------------------------------
after uploading the code you can start turning on/off the LEDs using IR remote.

I hope this tutorial was helpful and you can implement this in your projects like home automation. Just replace LED with Relays and you can turn on/off AC appliances.
That’s all for this tutorial, if you like it and want more feel free to follow/subscribe. In next tutorial we will make IR controlled Robot until then, keep experimenting 😉
-----------------------------------------------------------------------------
-------------------------------------------------------------------------------


#include <LiquidCrystal.h>#include <IRremote.h>
int RECV_PIN = 15 ;
IRrecv irrecv(RECV_PIN);
decode_results results;
const int rs = 12, en = 11, d4 = 5, d5 = 4, d6 = 3, d7 = 2;LiquidCrystal lcd(rs, en, d4, d5, d6, d7);
unsigned long key_value = 0;
unsigned long previousMillis = 0;  const long interval = 200;
void setup(){  Serial.begin(9600);
     lcd.begin(16, 2);   pinMode(16,OUTPUT);   digitalWrite(16,LOW);   pinMode(17,OUTPUT);   digitalWrite(17,HIGH);
  irrecv.enableIRIn();  irrecv.blink13(true);
    lcd.print("Manmohan Pal");  Serial.println("Enabling IRin");  irrecv.enableIRIn(); // Start the receiver  Serial.println("Enabled IRin");  delay(1000);    Serial.println("ready to accepte IR Remote input ");}
void loop(){

  if (irrecv.decode(&results)){
    Serial.println(results.value, HEX);    Serial.println(results.value, DEC);
        if (results.value == 0XFFFFFFFF)          results.value = key_value;
        switch(results.value){          case 0xFFC03F:          Serial.println("Mute");          break;          case 0xFF906F:          Serial.println("PWR");          break;        }        key_value = results.value;            lcd.clear();      lcd.setCursor(0, 0);      lcd.print(results.value, HEX);        lcd.setCursor(0, 1);      lcd.print(results.value, DEC);              irrecv.resume();   }    }
-----------------------------------------------------------------------------


Comments
Post a Comment