Day 10- Arduino EEPROM

Arduino EEPROM 

1) EEPROM.read(0);

2) EEPROM.write(0, 25);

3) EEPROM.get(0, brightness);

4) EEPROM.put(0, sensor_read);

5) 4 ch ir remote control circuit with EEPROM, IR, Pushbutton, Bluetooth


Arduino EEPROM Explained – Remember Last LED State


This tutorial explains what is the Arduino EEPROM and what it is useful for. We’re also going to show you how to write and read from the EEPROM and build a project example to put the concepts learned into practice.

Introduction

When you define and use a variable, the  generated data within a sketch only lasts as long as the Arduino is on. If you reset or power off the Arduino, the data stored disappears.


If you want to keep the data stored for future use you need to use the Arduino EEPROM. This stores the variable’s data even when the Arduino resets or the power is turned off.


What is EEPROM?

The microcontroller on the Arduino board (ATMEGA328 in case of Arduino UNO, shown in figure below) has EEPROM (Electrically Erasable Programmable Read-Only Memory). This is a small space that can store byte variables.


The variables stored in the EEPROM kept there, event when you reset or power off the Arduino. Simply, the EEPROM is permanent storage similar to a hard drive in computers.


The EEPROM can be read, erased and re-written electronically. In Arduino, you can read and write from the EEPROM easily using the EEPROM library.


How many bytes can you store?


Each EEPROM position can save one byte, which means you can only store 8-bit numbers, which includes integer values between 0 and 255.


The bytes you can store on EEPROM dependson the microcontrollers on the Arduino boards. Take a look at the table below:

Microcontroller                                             EEPROM
ATmega328 (Arduino Uno, Nano, Mini)    1024 bytes
ATmega168 (Arduino Nano)                            512 bytes
ATmega2560 (Arduino Mega)                     4096 bytes

However, if you need to store more data you can get an external EEPROM.
The EEPROM finite life

The EEPROM has a finite life. In Arduino, the EEPROM is specified to handle 100 000 write/erase cycles for each position. However, reads are unlimited. This means you can read from the EEPROM as many times as you want without compromising its life expectancy.

Applications in Arduino projects – Remember last state


The EEPROM is useful in Arduino projects that need to keep data even when the Arduino resets or when power is removed.

It is specially useful to remember the last state of a variable or to remember how many times an appliance was activated.

For example, imagine the following scenario:

    You’re controlling a lamp with your Arduino and the lamp is on;
    The Arduino suddenly loses power;
    When the power backs on, the lamp stays off – it doesn’t keep its last change.

You don’t want this to happen. You want the Arduino to remember what was happening before losing power and return to the last state.


To solve this problem, you can save the lamp’s state in the EEPROM and add a condition to your sketch to initially check whether the state of the lamp corresponds to the state previously saved in the EEPROM.

We’ll exemplify this with an example later in this post in the Example: Arduino EEPROM remember stored LED state.

Read and Write


You can easily read and write into the EEPROM using the EEPROM library.

To include the EEPROM library:

#include <EEPROM.h>

Write


To write data into the EEPROM, you use the EEPROM.write() function that takes in two arguments. The first one is the EEPROM location or address where you want to save the data, and the second is the value we want to save:

EEPROM.write(address, value);

For example, to write 9 on address 0, you’ll have:

EEPROM.write(0, 9);

Read


To read a byte from the EEPROM, you use the EEPROM.read() function. This function takes the address of the byte has an argument.

EEPROM.read(address);

For example, to read the byte stored previously in address 0.:

EEPROM.read(0);

This would return 9, which is the value stored in that location.


Update a value


The EEPROM.update() function is particularly useful. It only writes on the EEPROM if the value written is different from the one already saved.

As the EEPROM has limited life expectancy due to limited write/erase cycles, using the EEPROM.update() function instead of the EEPROM.write() saves cycles.

You use the EEPROM.update() function as follows:

EEPROM.update(address, value);

At the moment, we have 9 stored in the address 0. So, if we call:

EEPROM.update(0, 9);

It won’t write on the EEPROM again, as the value currently saved is the same we want to write.

Example: Arduino EEPROM remember stored LED state


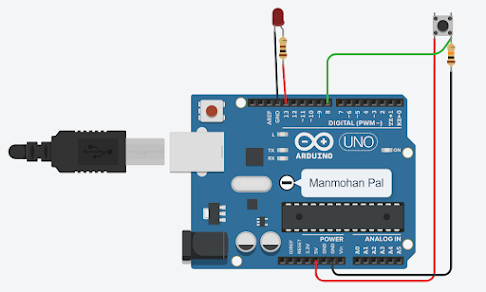
In this example, we’re going to show you how to make the Arduino remember the stored LED state, even when we reset the Arduino or the power goes off.

The following figure shows what we’re going to exemplify:


----------------------------------------------------------------------------------------------------------------------


#include <EEPROM.h>

const int buttonPin = 8;    // pushbutton pin
const int ledPin = 13;       // LED pin

int ledState;                // variable to hold the led state
int buttonState;             // the current reading from the input pin
int lastButtonState = LOW;   // the previous reading from the input pin


// the following variables are long's because the time, measured in miliseconds,
// will quickly become a bigger number than can be stored in an int.
long lastDebounceTime = 0;  // the last time the output pin was toggled
long debounceDelay = 50;    // the debounce time; increase if the output flickers

void setup() {
  // set input and output
  pinMode(buttonPin, INPUT);
  pinMode(ledPin, OUTPUT);

  // set initial LED state
  digitalWrite(ledPin, ledState);

  // initialize serial monitor
  Serial.begin (9600);

  //check stored LED state on EEPROM using function defined at the end of the code
  checkLedState();
}

void loop() {
  // read the state of the switch into a local variable
  int reading = digitalRead(buttonPin);

  if(reading != lastButtonState) {
    // reset the debouncing timer
    lastDebounceTime = millis();
  }

  if((millis() - lastDebounceTime) > debounceDelay) {
    // whatever the reading is at, it's been there for longer
    // than the debounce delay, so take it as the actual current state:

    // if the button state has changed:
    if(reading != buttonState) {
      buttonState = reading;

      // only toggle the LED if the new button state is HIGH
      if(buttonState == HIGH) {
        ledState = !ledState;
      }
    }
  }

  // set the LED state
  digitalWrite(ledPin, ledState);
  // save the current LED state in the EEPROM
  EEPROM.update(0, ledState);
  // save the reading.  Next time through the loop,
  // it'll be the lastButtonState
  lastButtonState = reading;
}

// Prints and upates the LED state
// when the Arduino board restarts or powers up
void checkLedState() {
   Serial.println("LED status after restart: ");
   ledState = EEPROM.read(0);
   if(ledState == 1) {
    Serial.println ("ON");
    digitalWrite(ledPin, HIGH);
   }
   if(ledState == 0) {
    Serial.println ("OFF");
    digitalWrite(ledPin, LOW);
   }
}

--------------------------------------------------------------------------------------------------------------------

Read eeprom 

#include <EEPROM.h>

int brightness;         //Create an empty variable

void setup() {
  Serial.begin(9600);
  while (!Serial) {
    // wait for user to open serial monitor
  }
}

void loop() {
  // read a byte from the address "0" of the EEPROM
  brightness = EEPROM.read(0);
  Serial.println(brightness);
  delay(500);
}

--------------------------------------------------------------------------

Write eeprom
#include <EEPROM.h> //include the library

int brightness;         //Create an empty integer variable

void setup() {
  Serial.begin(9600);   //Start serial monitor
  EEPROM.write(0, 25);  // write value 25 on address 0
  //Value must be between 0 and 255
}

void loop() {
  // read a byte from the address "0" of the EEPROM
  brightness = EEPROM.read(0);
  Serial.println(brightness); //Print it to the monitor
  delay(500);
}
------------------------------------------------------------------------

EEPROM Get You can also use the other functions from the previous list. For example,
the EEPROM.clear will empty the entire memory. With EERPOM.update,
we update a value only if that value is different and like that we increase the memory
life. Ok, now we know the basics on how to write and read from the Arduino EEPROM.
But is it possible to write an integer or a float value to this memory.
Those variables would occupy 2 or 4 bytes but we can only write 1 at a time.
For that let’s use these functions, EEPROM.put or EEPROM.get. We start with EEPROM dot get. Inside the parentheses we must place the address where
the data would start and the second part is the data variable where we want to store
the received value. So, if this variable is an integer type, the function will
automatically know to read 2 bytes instead of just 1 byte. If the variable is defined
as float, it will read 4 bytes and so on so we don’t have to care about the data length.
So I create an integer variable and name it brightness for example.

Then lets imagine that previously, using the EEPROM.put function we have written the
value 821 starting on address 0. So now I use the function EEPROM.get and for the
address I add a 0 and for the data I write the brightness variable I’ve created before.
The function will read 2 bytes starting from address 0 and store the received data
inside the brightness variable. If I run the program and we get the 821 nuerical
data which in this case is an integer and occupies 2 bytes.


---------------------------------------------------------------

Read an integer
Read an int

#include <EEPROM.h>

int brightness;         //Create an empty variable, type: integer

void setup() {
  Serial.begin(9600);
}

void loop() {
  // read an integer starting on address "0" and store the value on "brightness"
  EEPROM.get(0, brightness);    //EEPROM.get(start address, variable);
  Serial.println(brightness);
  delay(500);
}


----------------------------------------------------------------


read a float

#include <EEPROM.h>

float brightness;         //Create an empty variable, type: float

void setup() {
  Serial.begin(9600);
}

void loop() {
  // read a float starting on address "0" and store the value on "brightness"
  EEPROM.get(0, brightness);    //EEPROM.get(start address, variable);
  Serial.println(brightness);
  delay(500);
}

-----------------------------------------------------------------------

EEPROM PUT
In the same way, to write data of more than 1 byte, we use EEPROM.put.
Inside the parenthesis we first write the starting address and then the value to write.
For example, I create a float value and name it sensor_read and equal it to 70000.
Now I write that value on address 0 using the EEPROM.put.
Now once again I use the EEPROM.get function and add the address 0 and a float type variable named brightness.
I run the code and now I read 70000 which is a float type and occupies 4 bytes. 

---------------------------------------------------------------
#include <EEPROM.h>

float brightness;                   //Create an empty variable, type: float

void setup() {
  Serial.begin(9600);
  float sensor_read = 70000;     //Define a variable as float
  EEPROM.put(0, sensor_read);    //Write that value starting on address 0
}

void loop() {
  // read a float starting on address "0" and store the value on "brightness"
  EEPROM.get(0, brightness);
  Serial.println(brightness);
  delay(500);
}
------------------------------------------------------

Write a float with decimal point

#include <EEPROM.h>

float brightness;                   //Create an empty variable, type: float

void setup() {
  Serial.begin(9600);
  float sensor_read = 56.7;       //Define a variable as float
  EEPROM.put(0, sensor_read );    //Write that value starting on address 0
}

void loop() {
  // read a float starting on address "0" and store the value on "brightness"
  EEPROM.get(0, brightness);
  Serial.println(brightness);
  delay(500);
}

---------------------------------------------------------------------------------------

// 4 ch remote control circuit with pushbutton, bluetooth and EEPROM

#include <Wire.h>
#include <EEPROM.h>
#include <IRremote.h>

int irPin=11;
char Received;
IRrecv irrecv(irPin);
decode_results results;

int relay2=2;
int relay3=3;
int relay4=4;
int relay5=5;

int M2=EEPROM.read(0);
int M3=EEPROM.read(1);
int M4=EEPROM.read(2);
int M5=EEPROM.read(3);

int sw2= 14;
int sw3= 15;
int sw4= 16;
int sw5= 17;

void setup()
{
Serial.begin(9600);
pinMode(irPin,INPUT);

pinMode(sw2,INPUT);
pinMode(sw3,INPUT);
pinMode(sw4,INPUT);
pinMode(sw5,INPUT);

digitalWrite(sw2,HIGH);
digitalWrite(sw3,HIGH);
digitalWrite(sw4,HIGH);
digitalWrite(sw5,HIGH);

pinMode(relay2,OUTPUT);
pinMode(relay3,OUTPUT);
pinMode(relay4,OUTPUT);
pinMode(relay5,OUTPUT);

pinMode(11,INPUT);  // power for ir sensor

digitalWrite(relay2,M2);
digitalWrite(relay3,M3);
digitalWrite(relay4,M4);
digitalWrite(relay5,M5);

if (M2==1){Serial.print("Relay 2 OFF");}
else{Serial.print("Relay 2 ON"); }
if (M3==1){Serial.print("Relay 3 OFF"); }
else{Serial.print("Relay 3 ON"); }
if (M4==1){Serial.print("Relay 4 OFF"); }
else{Serial.print("Relay 4 ON"); }
if (M5==1){Serial.print("Relay 5 OFF"); }
else{Serial.println("Relay 5 ON"); }
delay(1000);
irrecv.enableIRIn();
}

void loop(){
 
int s2=digitalRead(sw2);
int s3=digitalRead(sw3);
int s4=digitalRead(sw4);
int s5=digitalRead(sw5);

////////////////////////////////////////////// IR Remote Code //////////////////////////////////////////////////////////////////////

if (irrecv.decode(&results)){
  Serial.println(results.value, DEC);
  Serial.println(results.value, HEX);
 
if (results.value ==16756815 || results.value ==16740495 || results.value ==33444015)
{switch (M2){
   case 0: M2=1; EEPROM.write(0,M2); Serial.println("Relay 2 OFF"); digitalWrite(relay2, HIGH); delay(100); break;
   case 1: M2=0; EEPROM.write(0,M2); Serial.println("Relay 2 ON"); digitalWrite(relay2, LOW); delay(100); break; }}
   
if (results.value ==16750695 || results.value ==16742535 || results.value ==33478695)
{switch (M3){
   case 0: M3=1; EEPROM.write(1,M3); Serial.println("Relay 3 OFF"); digitalWrite(relay3, HIGH); delay(100); break;
   case 1: M3=0; EEPROM.write(1,M3); Serial.println("Relay 3 ON"); digitalWrite(relay3, LOW); delay(100); break; }}

if (results.value ==16767015 || results.value ==16734375 ||results.value ==33486855)
{ switch (M4){
   case 0: M4=1; EEPROM.write(3,M4); Serial.println("Relay 4 OFF"); digitalWrite(relay4, HIGH); delay(100); break;
   case 1: M4=0; EEPROM.write(3,M4); Serial.println("Relay 4 ON"); digitalWrite(relay4, LOW); delay(100); break; }}
   
if (results.value ==16744575 || results.value ==16732335|| results.value == 33435855 )

{switch (M5){
   case 0: M5=1; EEPROM.write(4,M5); Serial.println("Relay 5 OFF"); digitalWrite(relay5, HIGH); delay(100); break;
   case 1: M5=0; EEPROM.write(4,M5); Serial.println("Relay 5 ON"); digitalWrite(relay5, LOW); delay(100); break; }}

if (results.value ==16748655 ||results.value == 33441975)
{
 M2=1; EEPROM.write(0,M2); Serial.println("Relay 2 OFF"); digitalWrite(relay2, HIGH); delay(100);
 M3=1; EEPROM.write(1,M3); Serial.println("Relay 3 OFF"); digitalWrite(relay3, HIGH); delay(100);
 M4=1; EEPROM.write(2,M4); Serial.println("Relay 4 OFF"); digitalWrite(relay4, HIGH); delay(100);
 M5=1; EEPROM.write(3,M5); Serial.println("Relay 5 OFF"); digitalWrite(relay5, HIGH); delay(100); }

if (results.value ==16760895 ||results.value == 33454215)
{
 M2=0; EEPROM.write(0,M2); Serial.println("Relay 2 ON"); digitalWrite(relay2, LOW); delay(100);
 M3=0; EEPROM.write(1,M3); Serial.println("Relay 3 ON"); digitalWrite(relay3, LOW); delay(100);
 M4=0; EEPROM.write(2,M4); Serial.println("Relay 4 ON"); digitalWrite(relay4, LOW); delay(100);
 M5=0; EEPROM.write(3,M5); Serial.println("Relay 5 ON"); digitalWrite(relay5, LOW); delay(100); }

   
irrecv.resume();
delay(10);
}
////////////////////////////////////////////// Bluetooth Code //////////////////////////////////////////////////////////////////////
if(Serial.available()>0)
 {
    Received = Serial.read();
    Serial.println(Received);
 }
if (Received =='a'){M2=1; EEPROM.write(0,M2); Serial.println("Relay 2 OFF"); digitalWrite(relay2,HIGH); Received ='o'; delay(250);}
if (Received =='A'){M2=0; EEPROM.write(0,M2); Serial.println("Relay 2 ON");  digitalWrite(relay2, LOW); Received ='o'; delay(250);}

if (Received =='b'){M3=1; EEPROM.write(1,M3); Serial.println("Relay 3 OFF"); digitalWrite(relay3,HIGH); Received ='o'; delay(250);}
if (Received =='B'){M3=0; EEPROM.write(1,M3); Serial.println("Relay 3 ON");  digitalWrite(relay3, LOW); Received ='o'; delay(250);}

if (Received =='c'){M4=1; EEPROM.write(2,M4); Serial.println("Relay 4 OFF"); digitalWrite(relay4,HIGH); Received ='o'; delay(250);}
if (Received =='C'){M4=0; EEPROM.write(2,M4); Serial.println("Relay 4 ON");  digitalWrite(relay4, LOW); Received ='o'; delay(250);}

if (Received =='d'){M5=1; EEPROM.write(3,M5); Serial.println("Relay 5 OFF"); digitalWrite(relay5,HIGH); Received ='o'; delay(250);}
if (Received =='D'){M5=0; EEPROM.write(3,M5); Serial.println("Relay 5 ON");  digitalWrite(relay5, LOW); Received ='o'; delay(250);}

if (Received =='z'){
 M2=1; EEPROM.write(0,M2); Serial.println("Relay 2 OFF"); digitalWrite(relay2, HIGH); delay(100);
 M3=1; EEPROM.write(1,M3); Serial.println("Relay 3 OFF"); digitalWrite(relay3, HIGH); delay(100);
 M4=1; EEPROM.write(2,M4); Serial.println("Relay 4 OFF"); digitalWrite(relay4, HIGH); delay(100);
 M5=1; EEPROM.write(3,M5); Serial.println("Relay 5 OFF"); digitalWrite(relay5, HIGH); delay(100); Received ='o';}

if (Received =='Z'){
 M2=0; EEPROM.write(0,M2); Serial.println("Relay 2 ON"); digitalWrite(relay2, LOW); delay(100);
 M3=0; EEPROM.write(1,M3); Serial.println("Relay 3 ON"); digitalWrite(relay3, LOW); delay(100);
 M4=0; EEPROM.write(2,M4); Serial.println("Relay 4 ON"); digitalWrite(relay4, LOW); delay(100);
 M5=0; EEPROM.write(3,M5); Serial.println("Relay 5 ON"); digitalWrite(relay5, LOW); delay(100); Received ='o';}

 delay(10);
////////////////////////////////////////////// Push Button Code //////////////////////////////////////////////////////////////////////
if (s2==LOW){ switch (M2){
   case 0: M2=1; EEPROM.write(0,M2); Serial.println("Relay 2 OFF"); digitalWrite(relay2, HIGH); delay(500);break;
   case 1: M2=0; EEPROM.write(0,M2); Serial.println("Relay 2 ON");  digitalWrite(relay2, LOW);delay(500); break; }}

if (s3==LOW){ switch (M3){
   case 0: M3=1; EEPROM.write(1,M3); Serial.println("Relay 3 OFF"); digitalWrite(relay3, HIGH);delay(500); break;
   case 1: M3=0; EEPROM.write(1,M3); Serial.println("Relay 3 ON");  digitalWrite(relay3, LOW);delay(500); break; }}

if (s4==LOW){ switch (M4){
   case 0: M4=1; EEPROM.write(2,M4); Serial.println("Relay 4 OFF"); digitalWrite(relay4, HIGH);delay(500); break;
   case 1: M4=0; EEPROM.write(2,M4); Serial.println("Relay 4 ON");  digitalWrite(relay4, LOW);delay(500); break; }}

if (s5==LOW){ switch (M5){
   case 0: M5=1; EEPROM.write(3,M5); Serial.println("Relay 5 OFF"); digitalWrite(relay5, HIGH);delay(500); break;
   case 1: M5=0;  EEPROM.write(3,M5); Serial.println("Relay 5 ON"); digitalWrite(relay5, LOW); delay(500);break; }}
delay(10);
}

---------------------------------------------------------------------------------------


---------------------------------------------------------------------------------------

No comments:

Post a Comment

Arduion Uno pin out