Day 4 - 16 x2 LCD, i2c Scanner, RTC module, Library

 Day 4 - 16 x2 LCD,  i2c Scanner, RTC module, Library


Task

1) How to install Libraries in Arduino IDE

2) Install Zip Libraries

3) Add Libraries using Copy Paste Process

4) Arduino LCD connection and Code

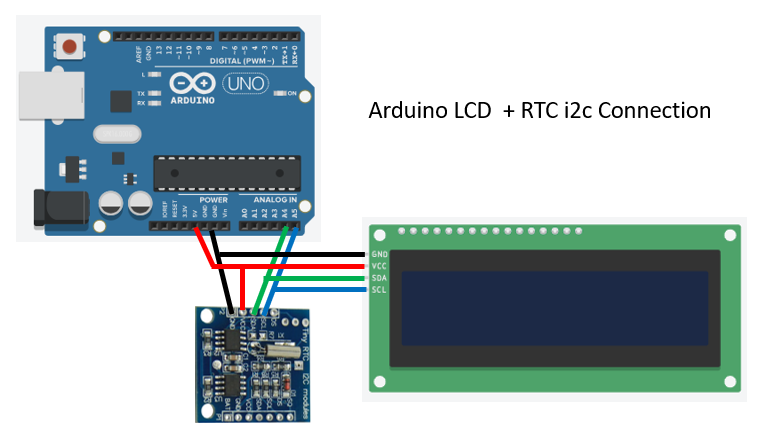
5) Arduino LCD connection using i2c Module, i2c scanner code and display msg code,

6) Install RTC library

7) set time in rtc 1307 through code

8) Get time from RTC and Display it on LCD

9) Set time in RTC using Push button


What are Libraries?

Libraries are a collection of code that makes it easy for you to connect to a sensor, display, module, etc. For example, the LiquidCrystal library makes it easy to talk to character LCD displays.


Using the Library Manager

To install a new library into your Arduino IDE you can use the Library Manager (available from IDE version 1.6.2). Open the IDE and click to the "Sketch" menu and then Include Library > Manage Libraries.


Then the Library Manager will open and you will find a list of libraries that are already installed or ready for installation. In this example we will install the Bridge library. Scroll the list to find it, click on it, then select the version of the library you want to install. Sometimes only one version of the library is available. If the version selection menu does not appear, don't worry: it is normal.


Finally click on install and wait for the IDE to install the new library. Downloading may take time depending on your connection speed. Once it has finished, an Installed tag should appear next to the Bridge library. You can close the library manager.

You can now find the new library available in the Sketch > Include Library menu. If you want to add your own library to Library Manager,


Importing a .zip Library

Libraries are often distributed as a ZIP file or folder. The name of the folder is the name of the library. Inside the folder will be a .cpp file, a .h file and often a keywords.txt file, examples folder, and other files required by the library. Starting with version 1.0.5, you can install 3rd party libraries in the IDE. Do not unzip the downloaded library, leave it as is.


In the Arduino IDE, navigate to Sketch > Include Library > Add .ZIP Library. At the top of the drop down list, select the option to "Add .ZIP Library''.


You will be prompted to select the library you would like to add. Navigate to the .zip file's location and open it.


Return to the Sketch > Include Library menu. menu. You should now see the library at the bottom of the drop-down menu. It is ready to be used in your sketch. The zip file will have been expanded in the libraries folder in your Arduino sketches directory.


NB: the Library will be available to use in sketches, but with older IDE versions examples for the library will not be exposed in the File > Examples until after the IDE has restarted.

-----------------------------------------------------------------------------------------

Arduino LCD connection and Code


// include the library code:
#include <LiquidCrystal.h>

// initialize the library by associating any needed LCD interface pin
// with the arduino pin number it is connected to
const int rs = 12, en = 11, d4 = 5, d5 = 4, d6 = 3, d7 = 2;
LiquidCrystal lcd(rs, en, d4, d5, d6, d7);

void setup() {
  // set up the LCD's number of columns and rows:
  lcd.begin(16, 2);
  // Print a message to the LCD.
  lcd.print("Manmohan Pal");
}

void loop() {
  // set the cursor to column 0, line 1
  // (note: line 1 is the second row, since counting begins with 0):
  lcd.setCursor(0, 1);
  lcd.print("Tutorial-");
  // print the number of seconds since reset:
  lcd.print(millis() / 1000);
}

--------------------------------------------------------------------------------

Arduino LCD i2c Connection


// first scan the i2c address using this code

// I2C SCANNER

#include <Wire.h>


void setup()
{
  Wire.begin();

  Serial.begin(9600);
  Serial.println("\nI2C Scanner");
}


void loop()
{
  byte error, address;
  int nDevices;

  Serial.println("Scanning...");

  nDevices = 0;
  for(address = 1; address < 127; address++ )
  {
    // The i2c_scanner uses the return value of
    // the Write.endTransmisstion to see if
    // a device did acknowledge to the address.
    Wire.beginTransmission(address);
    error = Wire.endTransmission();

    if (error == 0)
    {
      Serial.print("I2C device found at address 0x");
      if (address<16)
        Serial.print("0");
      Serial.print(address,HEX);
      Serial.println("  !");

      nDevices++;
    }
    else if (error==4)
    {
      Serial.print("Unknow error at address 0x");
      if (address<16)
        Serial.print("0");
      Serial.println(address,HEX);
    }    
  }
  if (nDevices == 0)
    Serial.println("No I2C devices found\n");
  else
    Serial.println("done\n");

  delay(5000);           // wait 5 seconds for next scan
}

--------------------------------------------------------------------------

//Correct the i2c Address for your LCD in the Code

#include <LiquidCrystal_I2C.h> LiquidCrystal_I2C lcd(0x20,20,4); // set the LCD address to 0x27 for a 16 chars and 2 line display void setup() { lcd.init(); // initialize the lcd // Print a message to the LCD. lcd.backlight(); lcd.setCursor(0,0); lcd.print("Manmohan Pal"); lcd.setCursor(0,1); lcd.print("Mob. 8989811397"); } void loop() { }
---------------------------------------------------------------------------------------------------

Install RTC library " RTCDS1397 " in Arduino IDE

Arduino RTC i2c Connection

#include "RTCDS1307.h"

RTCDS1307 rtc(0x68);

uint8_t year, month, weekday, day, hour, minute, second;
bool period = 0;

String m[12] = {"Jan", "Feb", "Mar", "April", "Mar", "Jun", "Jul", "Aug", "Sep", "Oct", "Nov", "Dec"};
String w[7] = {"Sun", "Mon", "Tue", "Wed", "Thu", "Fri", "Sat"};

void setup()
{
  Serial.begin(115200);
  rtc.begin();
 // rtc.setDate(19, 2, 28);
 // rtc.setTime(23, 59, 50);
}

void loop()
{
  rtc.getDate(year, month, day, weekday);
  rtc.getTime(hour, minute, second, period);
  if (!(second % 3)) rtc.setMode(1 - rtc.getMode());
  rtc.getTime(hour, minute, second, period);

  Serial.print(w[weekday - 1]);
  Serial.print("  ");
  Serial.print(day, DEC);
  Serial.print("/");
  Serial.print(m[month - 1]);
  Serial.print("/");
  Serial.print(year + 2000, DEC);
  Serial.print("  ");
  Serial.print(hour, DEC);
  Serial.print(":");
  Serial.print(minute, DEC);
  Serial.print(":");
  Serial.print(second, DEC);
  Serial.print(rtc.getMode() ? (period ? " PM" : " AM") : "");
  Serial.println();
  delay(1000);
}

------------------------------------------------------------------------------------
Display time on LCD


// Code to display RTC time on LCD 

#include "RTCDS1307.h"
#include <LiquidCrystal_I2C.h>

RTCDS1307 rtc(0x68);
LiquidCrystal_I2C lcd(0x27,20,4);

uint8_t year, month, weekday, day, hour, minute, second;
bool period = 0;

String m[12] = {"Jan", "Feb", "Mar", "April", "Mar", "Jun", "Jul", "Aug", "Sep", "Oct", "Nov", "Dec"};
String w[7] = {"Sun", "Mon", "Tue", "Wed", "Thu", "Fri", "Sat"};

void setup()
{
    lcd.init();                      // initialize the lcd
  // Print a message to the LCD.
  lcd.backlight();
  lcd.setCursor(0,0);
  lcd.print("Manmohan Pal");
  lcd.setCursor(0,1);
  lcd.print("Mob. 8989811397");
  Serial.begin(115200);
  rtc.begin();
 // rtc.setDate(23, 11, 21);
 // rtc.setTime(21, 48, 00);
}

void loop()
{
  rtc.getDate(year, month, day, weekday);
  rtc.getTime(hour, minute, second, period);
  if (!(second % 3)) rtc.setMode(1 - rtc.getMode());
  rtc.getTime(hour, minute, second, period);

  Serial.print(w[weekday - 1]);
  Serial.print("  ");
  Serial.print(day, DEC);
  Serial.print("/");
  Serial.print(m[month - 1]);
  Serial.print("/");
  Serial.print(year + 2000, DEC);
  Serial.print("  ");
  Serial.print(hour, DEC);
  Serial.print(":");
  Serial.print(minute, DEC);
  Serial.print(":");
  Serial.print(second, DEC);
  Serial.print(rtc.getMode() ? (period ? " PM" : " AM") : "");
  Serial.println();

lcd.setCursor(0,2);
lcd.print(hour, DEC);
lcd.print(":");
lcd.print(minute, DEC);
lcd.print(":");
lcd.print(second, DEC);

lcd.setCursor(0,3);
lcd.print(w[weekday - 1]);
  lcd.print("  ");
  lcd.print(day, DEC);
  lcd.print("/");
  lcd.print(m[month - 1]);
  lcd.print("/");
  lcd.print(year + 2000, DEC);
  lcd.print("  ");


  delay(1000);
}

--------------------------------------------------------------------------------


// Code to Set time in RTC using Push button

#include "RTCDS1307.h"

RTCDS1307 rtc(0x68);
int hh,mm,ss,DD,YYYY,mon, YY, bright;
String MM,dow;
int a=2;
int b=3;

int mode=0;
int mod=4;

uint8_t year, month, weekday, day, hour, minute, second;
bool period = 0;

String m[12] ={"Jan", "Feb", "Mar", "Apr", "May","Jun", "Jul", "Aug", "Sep", "Oct", "Nov", "Dec"};
String w[7] = {"Sun", "Mon", "Tue", "Wed", "Thu", "Fri", "Sat"};

void setup()
{
pinMode(a,INPUT);
pinMode(b,INPUT);
pinMode(mod,INPUT);
 
digitalWrite (a,HIGH);
digitalWrite (b,HIGH);
digitalWrite (mod,HIGH);

  Serial.begin(9600);
  rtc.begin();
 // rtc.setDate(19, 2, 28);
 // rtc.setTime(23, 59, 50);
}

void loop()
{
  rtc.getDate(year, month, day, weekday);
  rtc.getTime(hour, minute, second, period);
  if (!(second % 3)) rtc.setMode(1 - rtc.getMode());
  rtc.getTime(hour, minute, second, period);

  Serial.print(w[weekday - 1]);
  Serial.print("  ");
  Serial.print(day, DEC);
  Serial.print("/");
  Serial.print(m[month - 1]);
  Serial.print("/");
  Serial.print(year + 2000, DEC);
  Serial.print("  ");
  Serial.print(hour, DEC);
  Serial.print(":");
  Serial.print(minute, DEC);
  Serial.print(":");
  Serial.print(second, DEC);
  Serial.print(rtc.getMode() ? (period ? " PM" : " AM") : "");
  Serial.println();
  delay(1000);

int sw1=digitalRead(a);
int sw2=digitalRead(b);
int sw3=digitalRead(mod);

int hh=hour;
int mm=minute;
int ss=second;
int DD=day;
int mon=month;
MM= m[mon - 1];
int YY=year;
int YYYY=YY + 2000;
dow=w[weekday - 1];

if(sw3==LOW){mode=mode+1;
if(mode>5){mode=0;} Serial.print("mode");Serial.println(mode); delay(500);}

if (mode==1){ delay(50);  
if (sw1==0){ hh=hh+1;if (hh>23){ hh=0;}Serial.println(hh); delay(500); rtc.setTime(hh, mm, 00);}// set Hour
if (sw2==0){ hh=hh-1;if (hh<0){ hh=23;}Serial.println(hh); delay(500); rtc.setTime(hh, mm, 00);}}

if (mode==2){  delay(50);  
if (sw1==0){ mm=mm+1;if (mm>59){ mm=0;} Serial.println(mm); delay(500); rtc.setTime(hh, mm, 00); } // set Minutes
if (sw2==0){ mm=mm-1;if (mm<0){ mm=59;} Serial.println(mm); delay(500); rtc.setTime(hh, mm, 00); }}
 
if (mode==3){ delay(50);
if (sw1==0){ DD=DD+1; if(DD>31){DD=0;} rtc.setDate(YY, mon, DD);  Serial.println(DD); delay(500);}  // set DATE
if (sw2==0){ DD=DD-1; if(DD<0){DD=31;} rtc.setDate(YY, mon, DD);  Serial.println(DD); delay(500);}}

if (mode==4){ delay(50);    
if (sw1==0){ mon=mon+1; if(mon>12){mon=0;} rtc.setDate(YY, mon, DD);  Serial.println(mon); delay(500);}  // set Month
if (sw2==0){ mon=mon-1; if(mon<0){mon=12;} rtc.setDate(YY, mon, DD);  Serial.println(mon); delay(500);}}

if (mode==5){ delay(50);
if (sw1==0){ YY=YY+1; if(YY>30){YY=0;} rtc.setDate(YY, mon, DD);  Serial.println(YY); delay(500);}  // set year  
if (sw2==0){ YY=YY-1; if(YY<0){YY=30;} rtc.setDate(YY, mon, DD);  Serial.println(YY); delay(500);}}
}

No comments:

Post a Comment

Arduion Uno pin out